

Wow great work thanks for documenting it for us people with no spare room in the house so n hope of ever doing this! :)
DIY Cockpit and custom controlls
- Thread starter bacheshatonee
- Start date

I had some time before a job interview this afternoon, so I built a test panel for an FPS controller. I needed something to keep my head and hands busy. I tried to document each step as I went.
This is a test panel to see if it's worth even trying to do a nice one. Mainly looking at the types of buttons and positioning. It's a good run through of wiring a panel to be used with a BU0836. I am using the innards of CAT5 cable because it gives me a good color coding system and I have a ton of it around. There are 6 Columns and 6 rows plus GND and +5V. I use the blue, green, and brown pairs for 1-6, orange is +5V and orange and white is GND. I use one CAT5 Keystone jack for rows (Blue) and another for columns (White). That means I can just use CAT5 patch cables to connect each panel back to the box where the cards are and share any unused pins from one panel with any other panel. Analog inputs use the same scheme and numbering system except there are 8 so orange and orange and white become 7 and 8 as well as being used for ground and voltage. It makes the wiring a little confusing if you use all 8 analogs but I have only used 1 until now, and this will be adding another 3.
Here is the build:
First thing was to verify placement of the buttons. I have 3 buttons for each of the index, middle, and ring fingers. 2 rows of 3 buttons for the thumb, and a latching button for the pinky finger. I am also trying out a little 3 axes joystick I got off ebay for $25 to see how it works as an EVA controller. I am adding in a 4th "axis" in the form of buttons by mounting it on a floating base that can move up and down for movement in those directions. I've got the mounting plate in place, but not the up/down buttons. A lot of that will be playing around with the force you need to exert on the controller to get it to register. The foam is being used as a temporary spacer for a more permanent cushion I'll make later. The buttons are 12X12MM white momentary switches. I'm using .220" Optix from home depot. I had a sheet lying around, I want to say it was around $35 but that was a couple years ago. This is about 1/4 of the sheet. It's the thicker stuff because it will be directly supporting the weight of my arm and I do not want any give around the joystick. I use a standard router bit on my dremel to cut it. I use a piece of wood clamped down as my offset to ensure long cuts are straight, most everything else is freehand cutting with the router bit and guard.


I did the original layout on graph paper with a pencil. I put my hand in a comfortable position to push the buttons and marked the graph paper where my fingers were touching. I made about 2mm holes at each mark, put the paper on the optix and marked it with a sharpie. I used a drill press for a Dremel to drill the holes.

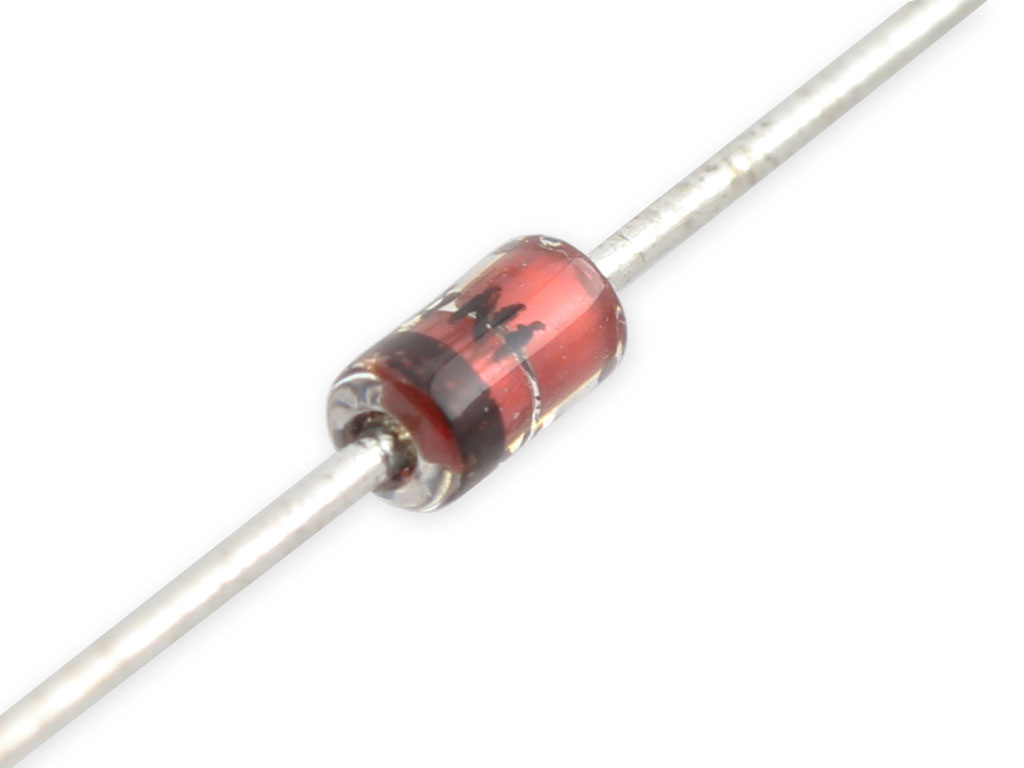
Next is soldering the wires and diodes onto the buttons. If there are multiple pins make sure you verify which are connected when the button is pressed and which are connected when the button is not pressed. In this case all 4 posts are connected to each other when the button is pressed, and only the post directly across is connected when the button is not pressed. Since I am using the wiring to keep the buttons in place I decided to solder to diagonal posts to keep them secured as evenly as possible. Once the buttons were soldered I cut the row side wires in half so that I could solder the diode in place. A diode is like a one way gate that allows the electrons to only flow in one direction. It's what allows you to connect every row to every column and still be able to tell what button is being pressed. The diodes need to only allow electrons to flow from the column to the rows. In practical terms this means that the side of the diode that has the black band closest to it needs to be the side that eventually connects to the row input in the card. Each "button" you wire needs a diode on the row side oriented toward the row side. Once the diode is soldered inline I shrink wrapped it to protect everything from shorting.

Here is what a diode looks like, the black line is the side that needs to lead to the row terminal on the BU0836A card. You should be able to pick up a 100 pack of them from an electronics store for less than $5
Once everything is soldered put the buttons into the panel by feeding the wires through the pre drilled holes. Next is to organize the wires into column and row sides and group everything together by color. Anything with a diode in it is a row and anything without is a column. Once you have the colors grouped. solder them together to a single wire. That single wire will then be wired into the appropriate color CAT5 Keystone Jack. Blue for rows and white for columns.
Here are the wires being organized. Columns are separated by color, rows are still unsorted.

The brown column wires have been cut shorter and are about to be soldered into a single wire.

The row wires have been grouped and soldered and the last is about to be shrink wrapped.

The wiring is fairly delicate at the point where it attaches to the button and comes through the plexy. Once you have it soldered and wrapped make sure you secure it to keep it from breaking. As this is temporary, securing means duct tape or hot glue. Once the keystone jacks are wired they are hot glued to the bottom of the panel.
Here are the column and row keystones all wired up. I use the standard "A" color coding so that everything is consistent and I can use off the shelf patch cables to connect everything.


Next is the Joystick. The pots are wired with +5V - Input - GND I color code the inputs but +5V and GND are orange and orange and white. They are all then wired in to their own keystone jack.

Here is a pic of it completed, minus the up/down for the EVA joystick which isn't completed yet. I know it's ugly, it's just meant to be a test piece but the wiring is exactly as it would be for a final piece minus the duct tape and hot glue of course.

All in all it is 16 buttons using all 6 rows connected to the brown and brown and white columns and 4 rows connected to the green and white column.
This is a test panel to see if it's worth even trying to do a nice one. Mainly looking at the types of buttons and positioning. It's a good run through of wiring a panel to be used with a BU0836. I am using the innards of CAT5 cable because it gives me a good color coding system and I have a ton of it around. There are 6 Columns and 6 rows plus GND and +5V. I use the blue, green, and brown pairs for 1-6, orange is +5V and orange and white is GND. I use one CAT5 Keystone jack for rows (Blue) and another for columns (White). That means I can just use CAT5 patch cables to connect each panel back to the box where the cards are and share any unused pins from one panel with any other panel. Analog inputs use the same scheme and numbering system except there are 8 so orange and orange and white become 7 and 8 as well as being used for ground and voltage. It makes the wiring a little confusing if you use all 8 analogs but I have only used 1 until now, and this will be adding another 3.
Here is the build:
First thing was to verify placement of the buttons. I have 3 buttons for each of the index, middle, and ring fingers. 2 rows of 3 buttons for the thumb, and a latching button for the pinky finger. I am also trying out a little 3 axes joystick I got off ebay for $25 to see how it works as an EVA controller. I am adding in a 4th "axis" in the form of buttons by mounting it on a floating base that can move up and down for movement in those directions. I've got the mounting plate in place, but not the up/down buttons. A lot of that will be playing around with the force you need to exert on the controller to get it to register. The foam is being used as a temporary spacer for a more permanent cushion I'll make later. The buttons are 12X12MM white momentary switches. I'm using .220" Optix from home depot. I had a sheet lying around, I want to say it was around $35 but that was a couple years ago. This is about 1/4 of the sheet. It's the thicker stuff because it will be directly supporting the weight of my arm and I do not want any give around the joystick. I use a standard router bit on my dremel to cut it. I use a piece of wood clamped down as my offset to ensure long cuts are straight, most everything else is freehand cutting with the router bit and guard.
I did the original layout on graph paper with a pencil. I put my hand in a comfortable position to push the buttons and marked the graph paper where my fingers were touching. I made about 2mm holes at each mark, put the paper on the optix and marked it with a sharpie. I used a drill press for a Dremel to drill the holes.
Next is soldering the wires and diodes onto the buttons. If there are multiple pins make sure you verify which are connected when the button is pressed and which are connected when the button is not pressed. In this case all 4 posts are connected to each other when the button is pressed, and only the post directly across is connected when the button is not pressed. Since I am using the wiring to keep the buttons in place I decided to solder to diagonal posts to keep them secured as evenly as possible. Once the buttons were soldered I cut the row side wires in half so that I could solder the diode in place. A diode is like a one way gate that allows the electrons to only flow in one direction. It's what allows you to connect every row to every column and still be able to tell what button is being pressed. The diodes need to only allow electrons to flow from the column to the rows. In practical terms this means that the side of the diode that has the black band closest to it needs to be the side that eventually connects to the row input in the card. Each "button" you wire needs a diode on the row side oriented toward the row side. Once the diode is soldered inline I shrink wrapped it to protect everything from shorting.
Here is what a diode looks like, the black line is the side that needs to lead to the row terminal on the BU0836A card. You should be able to pick up a 100 pack of them from an electronics store for less than $5
Once everything is soldered put the buttons into the panel by feeding the wires through the pre drilled holes. Next is to organize the wires into column and row sides and group everything together by color. Anything with a diode in it is a row and anything without is a column. Once you have the colors grouped. solder them together to a single wire. That single wire will then be wired into the appropriate color CAT5 Keystone Jack. Blue for rows and white for columns.
Here are the wires being organized. Columns are separated by color, rows are still unsorted.
The brown column wires have been cut shorter and are about to be soldered into a single wire.
The row wires have been grouped and soldered and the last is about to be shrink wrapped.
The wiring is fairly delicate at the point where it attaches to the button and comes through the plexy. Once you have it soldered and wrapped make sure you secure it to keep it from breaking. As this is temporary, securing means duct tape or hot glue. Once the keystone jacks are wired they are hot glued to the bottom of the panel.
Here are the column and row keystones all wired up. I use the standard "A" color coding so that everything is consistent and I can use off the shelf patch cables to connect everything.
Next is the Joystick. The pots are wired with +5V - Input - GND I color code the inputs but +5V and GND are orange and orange and white. They are all then wired in to their own keystone jack.
Here is a pic of it completed, minus the up/down for the EVA joystick which isn't completed yet. I know it's ugly, it's just meant to be a test piece but the wiring is exactly as it would be for a final piece minus the duct tape and hot glue of course.
All in all it is 16 buttons using all 6 rows connected to the brown and brown and white columns and 4 rows connected to the green and white column.
@Just Jake I have a Silhouette Cameo plotter that I use to cut out the decals. I guess decals isn't really the correct word. The ones I have pics of in this thread are really white lettering decals over black vinyl. The finals will be black vinyl with the lettering and backlit sections cut out or empty. The back will be covered over with white. It's essentially the same as yours just instead of printing the black over the white and sandwiching them between plexy mine are 2 separate layers on the front and back and I'm cutting out vinyl instead of printing the black directly to the white with a laser. I'm going to be putting black poster board to cover over the frames and once they are done each one will be it's own light box.
WarrenPeace
Space Marshal
Holy cow. Thank you for taking the time to write up such an in-depth explanation of your work, and for showing all of the pictures accompanying it. That look like a fantastic bit of work!
Metal-Muffin
Space Marshal
Here is a side panel. I rebuilt it today to make it wider to accommodate the new panels and switches. I'll build the right side panel tomorrow for the stick and then begin work on the center console. The panels that are in right now are just to give an idea of placement and size. I'm no carpenter, so it's not going to win any beauty contests, but it's functional.
View: http://imgur.com/TVk25zd
View: http://imgur.com/UpR8XWz
View: http://imgur.com/dqD330n
View: http://imgur.com/TVk25zd
View: http://imgur.com/UpR8XWz
View: http://imgur.com/dqD330n
It's prettier than mine, that's for sure. Your's does have sides and working lights. Really nice work. It's nice to see how someone else comes up with solutions for things. When you put together that sabre console, are you just making a center front console for on top of a desk, or are you going to build out a full cockpit? I had thought about building mine around a desk, the main reason I didn't is because I didn't have an extra desk, but I did have a car that was being sold as scrap which meant I could take a seat to build around instead of a desk to build around.
Metal-Muffin
Space Marshal
So, I can't justify dedicating any amount of space in my house to a cockpit, so my concept is going to be a cockpit that converts to a desk. I was able to justify this to my wife by converting our old right-angle computer desk into a sewing desk. I'm not exactly sure how I'm going to build a work surface onto a cockpit, but it'll most likely be in the form of a removable surface. My current plans include a keyboard/mouse tray that slides out from beneath the center console and is adjustable to vertical levels. (the hardware for that was cannibalized from old government issue furniture) that being said, I hope to build the starboard panel tomorrow and start on the center console next weekend. I hope to have everything done by June, because thats when the new X56 comes in.
Please don't plan you're rig around the new Saitek - 40% failure rate on their existing controllers. Friends don't let friends buy Saitek!!
Metal-Muffin
Space Marshal
From my x42 purchased in 2005, thru the x52 in 2012, to the x55 I have now, I've never had an issue. Also, I'm able to fix most electronics post warranty with a multimeter and an oscilloscope, so I'll be fine. Don't worry your pretty little head.Please don't plan you're rig around the new Saitek - 40% failure rate on their existing controllers. Friends don't let friends buy Saitek!!
Metal-Muffin
Space Marshal
The starboard panel. Following the concept of a cockpit/desk, I'm building small storage spaces under the light boxes that I'm installing the new switch panels into.
View: http://i.imgur.com/hPwiLrE.jpg
View: http://i.imgur.com/6DHsSdF.jpg
View: http://i.imgur.com/6SqdRLA.jpg
View: http://i.imgur.com/hPwiLrE.jpg
View: http://i.imgur.com/6DHsSdF.jpg
View: http://i.imgur.com/6SqdRLA.jpg
I can't wait for my son too grow up and move out so i can have his room...................just think of all the activities
Metal-Muffin
Space Marshal
View: http://imgur.com/gAxcGtx
Left up-front panel (UFP) w/ cougar and lcd. I can't justify the cost of the 8" required for the MFD's so I'm settling for backlit custom printouts instead of the boxed ones that come with it. The LCD's I do have are 7" and too small, but make good auxillary monitors. The center UFP will contain a 10" 16:9 display with a dedicated computer and will mirror (or extend) its output to the left/right displays via a VGA "Y" cable. Additionally, the main CUP will mirror/extend to the same displays via HDMI, and both displays have a convent button dedicated to input selection, which I'm rewriting to the panel buttons. Everything will be finished in .08" Optix for a smooth finish. The mounting holes for the buttons may or may not have been drilled by "eyeing it" after a few beers. Who am I kidding. They definately were.
Left up-front panel (UFP) w/ cougar and lcd. I can't justify the cost of the 8" required for the MFD's so I'm settling for backlit custom printouts instead of the boxed ones that come with it. The LCD's I do have are 7" and too small, but make good auxillary monitors. The center UFP will contain a 10" 16:9 display with a dedicated computer and will mirror (or extend) its output to the left/right displays via a VGA "Y" cable. Additionally, the main CUP will mirror/extend to the same displays via HDMI, and both displays have a convent button dedicated to input selection, which I'm rewriting to the panel buttons. Everything will be finished in .08" Optix for a smooth finish. The mounting holes for the buttons may or may not have been drilled by "eyeing it" after a few beers. Who am I kidding. They definately were.
Your cockpits look awesome, @Just Jake and @bacheshatonee!!! Unfortunately I can''t build my own. I sometimes use my PC for other things then flying and my "office" needs to be finished first.
A cockpit would be super, but with a fixed chair it would be unpractical for me, so I settled with 2 steel mounts on my office chair for flight stick and throttle. I noticed 2 things:
1. 3 mm steel plates still are not completely stable, especially for the throttle
2. even if the mounts would be stable, my chair also isn't stable enough
That will be fun when my rudder pedals are finished and arrive, then they also must be fixed to my chair to be effective :confused:. A fixed chair would be better :(. I still got a month or 2 to figure it out.
I focused on getting my triple display config running, it works great, but now I see your auxiliary LCD, can you do with the auxiliary LCD? I found some post where you can duplicate a part of your main display on an auxiliary display, but then you would have the same info on your main display and on your auxiliary display. The auxiliary would look great but wouldn't be used effectively, how do you intend to use your auxiliary @Just Jake ?
Metal-Muffin
Space Marshal
The LCDs won't work very well for Star Citizen unless exporting displays are built into the game/modded afterword, which isn't likely- but for DCS aircraft they'll work well. As for work space, I purchasd a linear actuator that will lower the front panel to a flat, desk surface for working on when working on needs working on. Think of a letter desk where the front panel folds down for a writing surface. The actuator is just to- well- why the f@ck not? The inside of the desk-pit (like that? I just made it up.) will have a USB hub, blue-Ray drive built in, and that's probably about it. The rest of the computer, PSU for the actuator and PWM LED strip back lighting, and power strip for the built in sound will be installed into (and covered from toddler-plug-pulling-hands) the back of the desk-pit (externally there will be 1 plug to rule them all) and a custom audio panel wich will mix audio and mic from the 2 computers into 3 channels for seperate VOIP services running simultaneously, all fed thru head phones for when I need to be quiet because the parasites are sleeping. I'm building it around a desk chair, not a fixed one, so it is more comfortable. Comfortable, meaning justifiable to the wifey. I just wish I were better at wood work. My strength is in all the little electronic bits and making the pixies dance the way I want.I focused on getting my triple display config running, it works great, but now I see your auxiliary LCD, can you do with the auxiliary LCD? I found some post where you can duplicate a part of your main display on an auxiliary display, but then you would have the same info on your main display and on your auxiliary display. The auxiliary would look great but wouldn't be used effectively, how do you intend to use your auxiliary @Just Jake ?
This has all come about from, "How do I securely fasten my HOTAS to my chair?", so be careful. Lol
Edit: tl;dr the aux LCDs function as 2 seperate monitors. Use them to view external content like monitor my pizza delivery time while I'm playing. ;-)
Last edited:
While looking for a good way to get my 3 displays working, (2 outside displays are 4:3, main is 16:9, that was the challenge) I found a post that a secondary display support is one of the stretched goals, somewhere around 20 -30 million, good news for the LCD :)The LCDs won't work very well for Star Citizen unless exporting displays are built into the game/modded afterword, which isn't likely- but for DCS aircraft they'll work well.
I'm used to allot of desk space, need to put my rubbish (and beer) somewhere :oops:. When I sit in front off my desk, then I cant't touch my screen without bending forwardAs for work space, I purchased a linear actuator that will lower the front panel to a flat, desk surface for working on when working on needs working on. Think of a letter desk where the front panel folds down for a writing surface.
I got the same idea :rolleyes:, the throttle and stick have more buttons then I assigned. LCD however would be better, although, I'm a dogfighter, a display for back view could also be very handy...The actuator is just to- well- why the f@ck not?
Hmmmmm, TEST has a very bad influence on me, I am thinking about integrating my mini fridge in the desk, I have one that can hold almost a crate of beer :DThe inside of the desk-pit (like that? I just made it up.) will have a USB hub, blue-Ray drive built in, and that's probably about it.
I didn't budgeted a second computer, in February I finally bought a new computer (the old one is a AMD K8-4400, I guess it was 8-9 years old and still running, sort of, half). Mic is not a priority, if I did that good, then everybody can hear my bad English and I can't blame it on my tablet, tablet is fine!!!!The rest of the computer, PSU for the actuator and PWM LED strip back lighting, and power strip for the built in sound will be installed into (and covered from toddler-plug-pulling-hands) the back of the desk-pit (externally there will be 1 plug to rule them all) and a custom audio panel wich will mix audio and mic from the 2 computers into 3 channels for seperate VOIP services running simultaneously, all fed thru head phones for when I need to be quiet because the parasites are sleeping.
I guess that rudder pedals will make a fixed chair necessary, must try it, it will be my first one. After long consideration I decided to buy the Warthog HOTAS, rudder pedals are a must. The Saitek are out of stock at the moment, the Thrustmaster T.Flight just came out, also no stock, so for the double price I ordered the MFG Crosswind. Recessions made it more then worth the price compared to the competitors.I'm building it around a desk chair, not a fixed one, so it is more comfortable. Comfortable, meaning justifiable to the wifey. I just wish I were better at wood work. My strength is in all the little electronic bits and making the pixies dance the way I want.
I know, I am looking for a decent game chair, the pre-build are expensive and don't justify the costs, so I'm looking for a car sports seat :cool:. I can handle wood, my father is good with iron and steel, electronics are also no problem, only my office still has to be finished :(This has all come about from, "How do I securely fasten my HOTAS to my chair?", so be careful. Lol
I had the plans for the seat mounts, my father did the rest, almost, a few holes had to be enlarged from 8 mm to 18 mm, busted a drill on that!
No comment on that one :rolleyes:Edit: tl;dr the aux LCDs function as 2 seperate monitors. Use them to view external content like monitor my pizza delivery time while I'm playing. ;-)
Metal-Muffin
Space Marshal
Lesson learned: don't drink and build. These panels are all lefts and no right.
View: http://imgur.com/XRHabny
Last edited:
Metal-Muffin
Space Marshal
But like a $10 hooker in a blackout, they sure look good in the dark!
View: http://imgur.com/XKbVf2e
View: http://imgur.com/XKbVf2e
View: http://imgur.com/gAxcGtx
Left up-front panel (UFP) w/ cougar and lcd. I can't justify the cost of the 8" required for the MFD's so I'm settling for backlit custom printouts instead of the boxed ones that come with it. The LCD's I do have are 7" and too small, but make good auxillary monitors. The center UFP will contain a 10" 16:9 display with a dedicated computer and will mirror (or extend) its output to the left/right displays via a VGA "Y" cable. Additionally, the main CUP will mirror/extend to the same displays via HDMI, and both displays have a convent button dedicated to input selection, which I'm rewriting to the panel buttons. Everything will be finished in .08" Optix for a smooth finish. The mounting holes for the buttons may or may not have been drilled by "eyeing it" after a few beers. Who am I kidding. They definately were.
I've been thinking about using these 8" screens and these USB to VGA adapters then just putting my own buttons around. It will have to wait till I have an income though. You could totally use these screens with those cougar panels.